I have now found a solution that is free, reliable, and very flexible. This is done by writing an Alexa Skill that adds a message to a cloud hosted queue based on your voice command. The Raspberry Pi repeatedly checks this queue for new messages, and runs customizable behaviour based on message contents. This is not limited to smart mirror applications, or Raspberry Pis. It can be used to launch any script you want on any platform that will connect to Amazon's SQS.
Here is a demonstration, and high level overview of how it works:
and a follow up demonstrating an extension of this idea:
In this tutorial I will focus on just using this to simply turn the smart mirror on and off. Adding your own scripts should then be fairly straight forward,
The steps will be as follows:
- Create a Queue using the Amazon Simple Queue Service (SQS)
- Write some python code to read and write to this queue
- Write a Lambda Function that posts messages to the queue
- Write an Alexa Skill that calls the Lambda Function
- Schedule a task on your Raspberry Pi to read queue messages and take appropriate action.
Creating a Queue
Creating an Amazon SQS queue is very straightforward. Just go to the SQS website, create an Amazon AWS account if needed, and click "Create New Queue". Name it whatever you want, and stick with the default settings. Personal use will also be infrequent enough that we will remain in the free tier.
Once the Queue is create, you simply need to note the url. This can be done by clicking on the queue in your SQS console, selecting the details tab, and reading the URL: property.

You will also need to create an amazon IAM user to get an api access key, and access secret for accessing the Queue. That can be done by visiting the IAM page, and clicking the "Users" tab, followed by "Add User".
Then you click the new user's name, and find the tab "Security Credentials" which will have a "Create access key" button. Click this button. This will open a dialogue window with the option to display access secret, and download csv. Download this file, or copy paste the access key and access secret into a text file.
Reading and Writing to Queue with Python
The only package you'll need beyond basic python is called boto3, so you will need to run $> python -m pip install boto3 to make sure this is installed.
Add your access key and secret, as well as queue url, and the region (which will be a substring in your queue url, such as "us-east-1") to the following code example.
This sets up your credentials, adds the message "test" to your queue, and then reads a message from the queue and deletes the message. This should print the word "test". Read this code over to ensure you understand what is going on. If you need some python brushing up, checkout my introduction post.
This code is just to define the behaviour needed. It will be split between the Lambda function, and the Raspberry Pi scheduled task. We will be using the "post_message" behaviour in the Alexa Skill, and the "read_message" behaviour running on the Raspberry Pi.
Write a Lambda Function to Post Queue Messages
The Lambda Function is where all the "thinking" for the Alexa Skill takes place. To create one of these, navigate to the AWS Lambda Page and click "Create A Lambda Function". A series of drop down menus will appear. Select runtime python2.7 and select the blank project template.
Now you need to configure a trigger. There will be an empty gray dotted box image linking to the Lambda Function. Click the dotted box, and choose "Alexa Skills" as the trigger.

Click next, and enter any function name and description. It is also recommended that you create a custom role under the Role dropdown, called "lambda_basic_execution" with the default rights. For more info on roles, you can follow this Amazon guide.
Then Select Python2.7 from the runtime drop down menu once again. This will display a code box with a single python function called lambda_handler. This is where the code triggered by an Alexa phrase will be placed. There is also an event parameter, which is where voice keyword behaviour is implemented (e.g. "on" or "off").
Then Select Python2.7 from the runtime drop down menu once again. This will display a code box with a single python function called lambda_handler. This is where the code triggered by an Alexa phrase will be placed. There is also an event parameter, which is where voice keyword behaviour is implemented (e.g. "on" or "off").
We will take some snippits from the demo code we wrote to write to the queue, and add some helper functions taken from AWS Lambda tutorial code for building a Lambda Function. You can copy paste the code below, but you will need to ensure you have added your api key, secret, location, and queue URL once again here.
Now click "Next" and "Create Function". Now under the Lambda -> Functions dashboard, you should see your function. If you click test, and select "Alexa Intent - Answer" from the dropdown, this should return a JSON response with "text: unknown". This will show the function is working as expected.
Now it's time to connect it to Alexa Skills.
Now it's time to connect it to Alexa Skills.
Writing an Alexa Skill
Update: There have been a few commenters informing me these instructions are out of date. As this is already very well documented elsewhere, I recommend reading Amazon's guide for writing a skill, and using this as a reference. The lambda code and utterances are still functional, but some of the setup details may have changed.
To write an Alexa Skill, you have to navigate to the Alexa Developer portal. In here, you will click "Get Started" under the Alexa Skills Kit. Then click "Add a New Skill" and give your skill a name.
To write an Alexa Skill, you have to navigate to the Alexa Developer portal. In here, you will click "Get Started" under the Alexa Skills Kit. Then click "Add a New Skill" and give your skill a name.
Under the invocation field, this will determine how you start this skills. Mine is called "magic mirror", and I have to say "Alexa, ask magic mirror (varying commands)" to invoke. Name yours whatever you want.
Clicking next will bring you to an intent scheme page. This defines all the different actions within your skill, and this information is passed to the Lambda Function as well. The code in the Lambda is tied to these Intents. So if you use something other than "MirrorOn" or "MirrorOff", you will need to update the corresponding section in the Lambda.
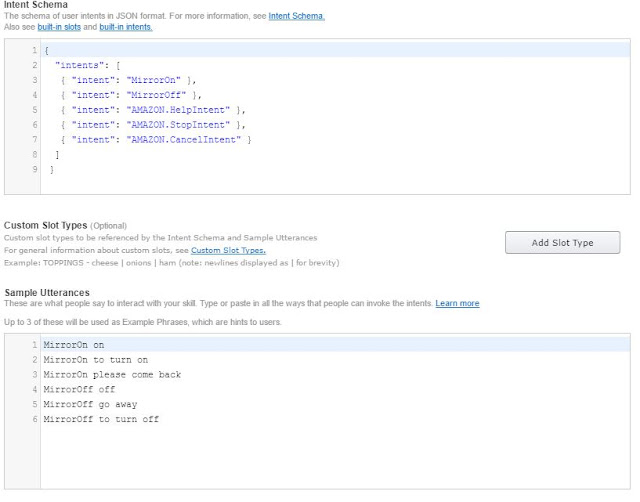

Note the intents MirrorOn and MirrorOff have a multiple sample utterances. These provide the context on what logic the Lambda should execute, with multiple ways to achieve the same thing. To dive deeper on utterances, here is a great blog post detailing how to cover as many phrases as possible.
Next you will have to add the Lambda Amazon Resource Name (arn) from your Lambda function to link the two in your skill configuration.
This can be found under the AWS Lambda Dashboard when you click Function, and on a function name. It will appear in the top right corner beside the bold ARN. Copy and paste that into the Alexa Skills text box after specifying your region.
 |
| Locating the Lambda ARN |
 |
| Link Lambda ARN to Alexa Skill |
Clicking next will bring you to a test page. Simply type your invoking phrase in the "utterance" box, and this should run your lambda function. Pay close attention to your utterance. If you have followed this tutorial verbatim, "turn on" or "turn off" should complete successfully, providing a JSON response with the "text:" parameter set to either on or off.
If you have the same account registered under the Alexa app settings, this skill should now be enabled automatically. You can confirm by visiting this link, and scrolling to find your skill.
This indicates the Lambda Function has successfully added an "on" or "off" message to the queue. Wonderful! Almost finished.
Reading the Queue from target system
In this case, I want my Raspberry Pi hosting the smart mirror software to check this queue for additional commands. This is done by using the python queue code developed earlier for reading messages, and running custom behaviour based on the message content.
The script reads from the queue and run the on or off actions is as follows. Once again, don't forget to add your own API, URL, and location information:
Now you can add a cronjob to run this script every minute. This script is using long polling for the queue message, which means it waits for 20s for a message to arrive. This is repeated until 1 minute has elapsed, and then cron relaunches the job. This keeps your SQS requests well in the free tier, but responds immediately to messages.
This can be added as a cronjob with the following commands:
$> crontab -e
Modifying this textfile to add the following line (with a newline break):
* * * * * python3.4 /home/pi/alexa_skill/check_queue.py
The tv on and off scripts can be found here.
Extended Functionality
This has applications far beyond simply starting and stopping a TV. Anything you can write a script for can now be triggered using custom Alexa Voice Commands. Considering the Raspberry Pi is equipped with GPIO ports, this means you can use voice commands to spin motors, unlock doors, turn on lights, and much much more.
Awesome writeup! Might I recommend Sonus: https://github.com/evancohen/sonus
ReplyDeleteonelilfizzle, looks interesting, but I'm having a little trouble connecting the dots. Would this achieve the same as I've done here, but with the everything except the voice processing occurring locally?
ReplyDeleteMight have to give this a try.
Well, I followed your fantastic directions, but now I can't figure out how to add my new skill to my own Echo.... :|
ReplyDeleteHey Unknown, you have to have your device registered under the same account you wrote the Alexa skill under. Checkout alexa.amazon.com, click skills, then look for "Your skills" at the top to check you've got it enabled.
ReplyDeleteModifying this textfile to add the following line (with a newline break):
ReplyDelete* * * * * python3.4 /home/pi/alexa_skill/check_queue.py
Hi sir may I know what is this check_queue.py
Thanks! :)
Regards,
Derrick
Hi ben,
ReplyDeletethe command seems to be taking a random 5-30 secs to take place.
Is there any way to improve this?
Thanks in adv!
Hi Derrick, you can change the duration of the "sleep" command in the python check_queue script to check more frequently, but this could put you over the "free" threshold SQS threshold and end up costing a couple dollars a month. You're probably not going to get more responsive than 2-5s though just based on queue refresh rate.
ReplyDeleteHi Ben,
ReplyDeleteA huge thank for your detailed reply.
I believe I have followed everything as you have done, and it is really taking a random 5-30 seconds.
Could it be the delay over the cloud? As in I am using the East US setting but I am located at Singapore.
Thanks!
Amazing. For Mirror On and Mirror off, do you just tell it to put the raspberry pi to sleep? Or to put a black screensaver? If the raspberry pi were off, Alexa wouldnt work so "mirror on" wouldn't work.
ReplyDeleteThank you for sharing your wonderful implementation. Curious as to why you use SQS instead of MQTT?
ReplyDeletewhere exactly was queue_service.py used?
ReplyDeleteIt's just educational to show what you want done but isn't run in the final implementation. Its functionality gets split between the lambda_function.py and check_queue.py files. Hope that makes sense.
ReplyDeleteThank you Ben, it's makes sense now.
ReplyDeleteif got a question. if i ask alexa to turn de mirror off she says i cant help you with that. if i run a test on the lambda page with off than my screen goes off. what do i need to do to fix it??
ReplyDeleteHey Roy, I had some trouble until I realized I had to say specifically "Alexa, ask (appname) turn on / turn off". I think the lambda test has an assumed utterance that comes before starting the app, you have to include that bit too. Does that make sense?
ReplyDeleteno sorry i dont understand that. i did exacly like the discription and named it the same.. if i say alexa ask magic mirror off. i hear a beep and than noting. can you explain it in noobie plz? im from the netherlands so its hard to understand
ReplyDeletei that it was some problem on the pi, but i think thats not the problem because he turns the screen off then you type it on the test right?
ReplyDeletegreets roy
Sorry Roy, but this is almost impossible to diagnose from the info you have given me. If it is working when you type the command and not working through your alexa device, it's probably related to your utterances. Otherwise, try to isolate what piece is not working and we can take it from there.
ReplyDeletehey ben!
ReplyDeletethanks. im gonna try it tomorrow
Hi ben, great project, been following along and so far, have been able to replicate. When I run the test after creating the function in lambda I get the following:
ReplyDelete{
"errorMessage": "Handler 'handler' missing on module 'index'"
}
I even tried to copy and paste the above code for the lambda function only editing the sections in relation to keys ids and urls. I'm not seeing where I made my error, any chance your able to point me in the right direction?
Hi Barrett, I'm not sure what this would. Do you get anything else in your error message (line numberm etc)? Have you successfully linked the lambda ARN to your skill?
ReplyDeleteJust a cool thought, not sure how useful it is to you. I saw an article a while back about creating a "Smart Power Strip" using a raspberry pi. This could be useful in a network closet type scenario. Have your firewall and network switches on the smart power strip and create scripts to cut and restore power to individual outlets. Then create triggers to run each individual script based around keywords. For instance "Alexa, ask network closet reboot switch 3". I would never trust anything like this for an enterprise environment but could make a cool addition to advanced home networks.
ReplyDeleteHey baker397, thanks for the great suggestion! I've actually needed that on many occasions.
ReplyDeleteThis comment has been removed by the author.
ReplyDeleteAs a follow up, I found my error in Lambda, as far as I can tell. Corrected it, and received a success for testing. Moving on to Alexa Skills, where if I do a text for mirror off I get something other than a endpoint could not be reached. I have to say, this has taught me quite a bit and I'm grateful you put this up for others to learn from.
ReplyDeleteI love your instruction - exactly what I needed.
ReplyDeletecan you give me a hint where would I need to change the code if I want alexa to say something else than on/off ?
E.g. "Turning TV off"
Thanks HD, checkout the "message" being passed in the Alexa lambda_handler to build a response.
ReplyDeleteHello Ben, I have some trouble selecting the blueprints and testing my lambda function. Following are my issues:
ReplyDelete1. As you said select Run-time: python 2.7 and then select a blank project template, I can't find a blank template in there. Instead I tried selecting and going ahead with the 'alexa-skills-kit-color-expert' but still no success.
2. I entered my function name and the description and also selected the run-time but I do not get the lambda_handler code box displayed.
3. When I go ahead and try to test the function choosing the Alexa Intent-Answer, I obtain an error saying 'Execution result:failed(logs)'.
Would appreciate an immediate reply as I'm working on it. Thank You
There's a small error in line 21 of the sample code in section "Reading and Writing to Queue with Python". The argument 'url' should be changed to 'queue_url'.
ReplyDeleteFixed, thanks kal!
ReplyDeleteWaiting for your reply Ben! I need it ASAP.
ReplyDeletePooja, it has been a while since I wrote this, so it's possible the skill web dashboard has changed. I would recommend trying another Skill specific tutorial if these instructions aren't working for you.
ReplyDeleteI haven't owned or even touched an Echo yet but am interested in acquiring one. Instead of polling to keep it under a million times a month, is there an option to trigger instead? Can a skill be made to post a Http request to my Raspberry Pi so as to start the script?
ReplyDeleteHey s/360, there are probably 100 ways to set this up as it's really just a notification system. An http request would work but you'd have to publish a port to the world (or at least Lambda function) from your home network. The easiest way I know for a push notificationis through Amazon's AWS IoT Thing Shadow. Now that I've added long polling it's only 3 requests per minute though, and responses are instant, so I'm pretty happy with this solution.
ReplyDeleteIn the Enter Utterance: "MirrorOn"
ReplyDeleteI get the following message: The remote endpoint could not be called, or the response it returned was invalid.
Okay, I figured it out. In the SQS, click on Permissions. Give permission to everybody.
ReplyDeleteSo, I got successfully to the "Reading the Queue from target system part".
ReplyDeleteWhen I give the command to Alexa, she does answer correctly with "on" or "off" but the TV does not turn on nor off.
I created the tvon.sh and tvoff.sh files, placed them in my /home/pi folder and made them executable via chmod. I executed the files via the terminal without issues but no success asking Alexa to do it.
I think it may have to do with the python -m pip install boto3 that failed or the check_queue.py file.
Which folder is check_queue.py supposed to go to? I created a /home/pi/alexa_skill folder to match the * * * * * python3.4 /home/pi/alexa_skill/check_queue.py line from the crontab and put it there.
In which folder should I execute the command python -m pip install boto3?
Nice work so far. It is 100% the check_queue.py script which is not working. The important bit is that the directory is line 32 be properly resolved. It is looking for the script in ~ which is /home/pi - so it shouldn't actually matter where check_queue is being run from.
ReplyDeleteThe command "python -m pip install boto3" is to install boto3. I suspect you may have two versions of python in your system... Can you try this instead (from anywhere)? "python3 -m pip install boto3"
Then make sure you're running check_queue.py with python3 as well instead of just python.
I would also suggest you run python3 check_queue.py in a terminal. Do you get any output when you issue commands? Any error messages?
Ok, I tried installing boto3 using python3 and got an error.
ReplyDeleteAlso tried to run check_queue.py with python3 and it tells me
Traceback (most recent call last):
File "/home/pi/alexa_skill/check_queue.py", line 1, in
import boto3
ImportError: No module named 'boto3'
So definitely an issue with the boto3 install. Here is the error log from the python3 -m pip install boto3 command:
Downloading/unpacking boto3
Downloading boto3-1.5.1-py2.py3-none-any.whl (128kB): 128kB downloaded
Downloading/unpacking botocore>=1.8.15,<1.9.0 (from boto3)
Downloading botocore-1.8.15-py2.py3-none-any.whl (4.0MB): 4.0MB downloaded
Downloading/unpacking jmespath>=0.7.1,<1.0.0 (from boto3)
Downloading jmespath-0.9.3-py2.py3-none-any.whl
Downloading/unpacking s3transfer>=0.1.10,<0.2.0 (from boto3)
Downloading s3transfer-0.1.12-py2.py3-none-any.whl (59kB): 59kB downloaded
Downloading/unpacking docutils>=0.10 (from botocore>=1.8.15,<1.9.0->boto3)
Downloading docutils-0.14-py3-none-any.whl (543kB): 543kB downloaded
Downloading/unpacking python-dateutil>=2.1,<3.0.0 (from botocore>=1.8.15,<1.9.0->boto3)
Downloading python_dateutil-2.6.1-py2.py3-none-any.whl (194kB): 194kB downloaded
Requirement already satisfied (use --upgrade to upgrade): six>=1.5 in /usr/lib/python3/dist-packages (from python-dateutil>=2.1,<3.0.0->botocore>=1.8.15,<1.9.0->boto3)
Installing collected packages: boto3, botocore, jmespath, s3transfer, docutils, python-dateutil
Cleaning up...
Exception:
Traceback (most recent call last):
File "/usr/lib/python3/dist-packages/pip/basecommand.py", line 122, in main
status = self.run(options, args)
File "/usr/lib/python3/dist-packages/pip/commands/install.py", line 295, in run
requirement_set.install(install_options, global_options, root=options.root_path)
File "/usr/lib/python3/dist-packages/pip/req.py", line 1436, in install
requirement.install(install_options, global_options, *args, **kwargs)
File "/usr/lib/python3/dist-packages/pip/req.py", line 672, in install
self.move_wheel_files(self.source_dir, root=root)
File "/usr/lib/python3/dist-packages/pip/req.py", line 902, in move_wheel_files
pycompile=self.pycompile,
File "/usr/lib/python3/dist-packages/pip/wheel.py", line 214, in move_wheel_files
clobber(source, lib_dir, True)
File "/usr/lib/python3/dist-packages/pip/wheel.py", line 204, in clobber
os.makedirs(destdir)
File "/usr/lib/python3.4/os.py", line 237, in makedirs
mkdir(name, mode)
PermissionError: [Errno 13] Permission denied: '/usr/local/lib/python3.4/dist-packages/boto3-1.5.1.dist-info'
Storing debug log for failure in /home/pi/.pip/pip.log
Ok, I got rid of the error by using sudo to install python3. It works and the voice command tuns the screen on and off.
ReplyDeleteNew issue now; when I turn the screen back on, nothing shows up on screen. I can definitely tell that the screen is back on because of the power light but it is just a black screen.
Any insight on how to fix this last issue?
My guess is it may have to do with the script in tvon.sh:
ReplyDelete#!/bin/bash
tvservice -p
fbset -depth 8
fbset -depth 32
Alright, that wasn't too hard to fix. The issue was indeed with the tvoff and tvon.sh. I changed the scripts using "vcgencmd display_power" instead of "tvservice". No more issues.
ReplyDeleteThanks for the help and great tutorial; I learned a lot.
Thanks Jerome, I'm really glad it was helpful for you. And thanks for sharing your solutions with others here!
ReplyDeleteHuh, looks like my previous comment didn't actually post.
ReplyDeleteI modified your files for my purposes and "to turn off" and "to shut down" don't work and are routed to "unknown" in the python lambda function. However "off", "go away", etc all work to be able to shutdown my pi.
I got the email about your comment, but couldn't find it here too - so assumed you'd solved it... Weird!
ReplyDeleteAnyway, my recommendation is to check the Alexa web dashboard to see exactly what your wording was. If your your phrases appear exactly as your invocations do, I'm honestly not sure. I'll look into it when I'm back home next week.
Please let me know if you find a resolution in the mean-time!
Yeah I checked the dashboard, they are appearing exactly as the invocations are set up. I originally had to fix one from "to shutdown" to "to shut down" to see if that was the issue. I have a ticket in with Amazon at the moment to try to figure it out. Just figured I'd ask here since this is where I got the code I am using as a base.
ReplyDeleteI'll post back if I figure it out or hear from Amazon.
ReplyDeletefirst of all its one of the best project you explained everything clearly man ..hatts of to you hard work....
ReplyDeletewell ben in which folder should i need to execute the command $> python -m pip install boto3....?
how to read and write to Queue with Python...??
ReplyDeletemeans would i need to create a python file or it is being done in amazon website in SQS..???
if i need to make a python file where should i save him??
im new to this that is why i need you help ..
Got the reply from Amazon. The problem was with my sample utterances file. I had to remove to from the sample utterances. The file now looks like this with all functions working properly.
ReplyDeletevacation vacation
school school
PiOff terminate
PiOff shut down
PiOff turn off
PiOff go away
PiOff off
PiReboot restart
PiReboot reboot
BTW, I'd like to credit you with what I'm making as a lot of my python code was taken from your tutorial and adapted to my needs for the project. I'm just unsure how would be best to do that. As I'm very new to doing this kind of thing, but I'm hoping that my project might be able to help other parents once I'm done with it.
ReplyDeletehttps://github.com/korreckj328/Alexapi-Special-Needs-Assistant
Hey Charononus, thanks for the update - and it is so cool to see the code being used in your project like this! This is what I hope for with most posts, that it serves as a jumping off point for a more in depth project. Thanks for wanting to give some credit too. While it's not necessary, if you don't mind mentioning this blog as your starting point somewhere in the readme it would be appreciated! I'm following the project now too on github, so I look forward to the updates.
ReplyDeleteyash - you can run the python install command from any directory. This installs the package in the python directory, not your current working directory.
ReplyDeleteAs for SQS questions, sounds like you have a lot of uncertainty about how this works. I would suggest reading some tutorials specifically about using SQS, and reading their docs: http://boto3.readthedocs.io/en/latest/guide/sqs-example-sending-receiving-msgs.html
Awesome instructions - had a figure a few things out, but this was by far the best summary I found on the net
ReplyDeleteSo I tried to follow this tutorial and I was able to successfully run the queue_service.py, but when I test the lambda function it says it succeeds but the response is Response:
ReplyDelete{
"version": "1.0",
"response": {
"outputSpeech": {
"text": "Unknown",
"type": "PlainText"
},
"shouldEndSession": "true",
"reprompt": {
"outputSpeech": {
"text": "",
"type": "PlainText"
}
},
"card": {
"content": "SessionSpeechlet - Unknown",
"type": "Simple",
"title": "SessionSpeechlet - Mirror Status"
}
},
"sessionAttributes": {}
}
And when I run the Alexa skill test it returns "null" and says there was a problem with the requested skill's response. Any ideas of where I'm going wrong? Thank you
Returning null sounds like a python error, can you get any more info? You should see the JSON returned.
ReplyDeleteI would confirm you're running python 2 instead of 3, and setting the response just an empty "{}" and see if the same behaviour occurs.
So I decided to go ahead and test the whole code, as is, on the Alexa Pi and miraculously it worked! I'm not sure exactly what I was doing wrong in testing, but apparently it did not effect the final outcome. I do have a question regarding the free-tier limit for the SQS though, if I were to continually run this code (essentially the exact same code you posted) would I reach anywhere near the free-tier limit of 1 million? I'm still slightly confused on how the requests are made
ReplyDeletethis tutorial may be out of date, doing the first step with SQS leads to a non excisting page. Searching for it i found "Simple Queue Service" clicking that one gives me this:
ReplyDelete" Your service sign-up is almost complete!
Thanks for signing up with Amazon Web Services. Your services may take up to 24 hours to fully activate. If you’re unable to access AWS services after that time, here are a few things you can do to expedite the process:
Make sure you provided all necessary information during signup. Complete your AWS registration.
Check your email to see if you have received any requests for additional information. If you have, please respond to those emails with the information requested.
Verify your credit card information is correct. Also, check your credit card activity to see if there’s a $1 authorization (this is not a charge). You may need to contact your card issuer to approve the authorization.
If the problem persists, please contact Support:"
again, your tutorial is out of date. I know its much to ask but could you update it? because it is almost impossible to follow it with the changes Amazone have done.
ReplyDeleteThis is a personal project I decided to write up and share, so I'm not going to commit to maintaining an up to date tutorial regarding external services. The SQS section may be out of date, but the code still works.
ReplyDeleteHey Ben,first of all appreciateing for the work you have done. I'm making a smart mirror for my final year project and i just want to make my mirror more interactive so can you please help me by telling the steps for writing alexa skills
ReplyDeleteI also cannot get the settings under Amazon right in order to test the Lambda handler. Amazon has changed so much that I would really like to see an update in the installation manual. I tried many settings but always run into errors while running the Alexa Answer test routine.
ReplyDeleteAnybody can help ?
Great post!
ReplyDeletei think i have done everything as writen but cant seem to get the test right.
getting this error:
he remote endpoint could not be called, or the response it returned was invalid.
i have given everybody all sqs permissions.
got an idea of whats wrong?
-hi i seem to have missed a tabulator on the last py command, i now get a response in the test
ReplyDeleteHi Masus, didn't get a chance to look into this yet so I'm glad you got it going! Are you using this for a smart mirror?
ReplyDeleteThis is awesome, thanks for this write-up, very great tutorial for the beginner! Worked perfect.
ReplyDeletehello,
ReplyDeletei know this was posted awhile ago and im pretty new to this sort of thing but i am having trouble understanding exactly where the check_queue.py and the queue_service.py are suppose to be written. i am assuming they are ran on the pi itself but when i do that i am not getting a realistic output
also, i am getting an error when i am adding the * * * * * python3.4 /home/pi/alexa_skill/check_queue.py to the end of my crontab. i am getting this:
ReplyDeletecrontab: installing new crontab
"/tmp/crontab.uljV6d/crontab":23: bad command
errors in crontab file, can't install.
any suggestions?
queue_service.py is actually just a demonstration of what the python code is doing in the lambda function and the check_queue.py. lambda_function.py runs in the Lambda service, and check_queue.py runs on your pi.
ReplyDeleteCrontab is usually pretty straightforward so long as you included a newline after the entry and placed it at the bottom of the text file.
Hope that helps!
Cool project! I couldn't understand if you had to change the url in the above code?
ReplyDeleteThe rest of it all works fine for me, but the lambda segment, there is no AlexaSkills option, and everything ive tried to get past that hasn't worked. Have you got any ideas?
ReplyDeleteHey, can you give a bit more info? Do you mean there is no Alexa Skills Kit trigger?
ReplyDeleteYes. Sorry if i wasn't clear about that, there is no trigger for alexa skills. The lambda doesnt offer an alexa skills trigger. Possibly I am misinterpreting the options but I am only offered:
ReplyDelete- API Gateway
- AWS IoT
- CloudWatch Events
- CloudWatch Logs
- CodeCommit
- Cognito Sync Trigger
- DynamoDB
- Kinesis
- S3
- SNS
It's possible however, that I simply stuffed it somewhere along the way, though Im unsure where.
The lambda is also assigned the amazon cloudwatch logs as a resource automatically (non-removable)
Hooe that is more insightful and thanks for the help
Hi Ben. I followed this guide and although a lot of the AWS stuff is different, I managed to still get it working. So far I can turn my computer on/off and set the light levels of my living room lights. Pretty cool.
ReplyDeleteAnyway, the major differences that I came across are that as another commentor mentioned, the Lambda part looks very different and I was unable to test it as suggested in the guide. However I skipped the test and using exactly the code you provided and it worked as expected.
The Skills creation part is also very different although I think it actually looks like they improved it from when you did it for your guide and it quite easy to use now. Remember to rebuild the skill and save the lambda code after making any changes.
Anyway, thanks for the writeup, I never would have got anywhere close.
Hi Ben,
ReplyDeleteThanks for the great guide. I've made it towards the end, but when testing the alexa skill I receive "null" in the response JSON. Any idea why this would be happening?
@ Anonymous
ReplyDelete(and for anyone who doesn't see Alexa Skills Kit in the list of triggers when creating your lambda function)
Some regions do not have ASK as an option. The region you chose does not have to be based off of where you life, it's directed toward where you users would be. But if you want to use ASK as a trigger, just select the nearest region that offers it. Ie. I had to switch from US-East-2 to US-East-1.
I receive this error message when testing the Lambda Function:
ReplyDelete"START RequestId: e0ac94e4-ad47-11e8-be63-b905f2db3dca Version: $LATEST
Handler 'lambda_handler' missing on module 'lambda_function': 'module' object has no attribute 'lambda_handler'
END RequestId: e0ac94e4-ad47-11e8-be63-b905f2db3dca
REPORT RequestId: e0ac94e4-ad47-11e8-be63-b905f2db3dca Duration: 0.74 ms Billed Duration: 100 ms Memory Size: 128 MB Max Memory Used: 32 MB"
But I've used your code verbatim (except adding my own access key, secret, region, and URL).
Included in that code IS:
def lambda_handler(event, context):
client = boto3.client('sqs', aws_access_key_id = access_key, aws_secret_access_key = access_secret, region_name = region)
intent_name = event['request']['intent']['name']
if intent_name == "MirrorOn":
post_message(client, 'on', queue_url)
message = 'On'
elif intent_name == "MirrorOff":
post_message(client, 'off', queue_url)
message = "off"
else:
message = "Unknown"
So I don't know why the error says it isn't define. Any help is appreciated! Thank you.
Im getting the error: Null Speechlet Response
ReplyDeleteDoes anyone know why?
I have finally got Alexa to work on my Magic Mirror. However, it doesn't see my existing skills, e.g. I ask her to turn off my bedroom light but she responds saying no skills have been added. Which isn't the case, as my Alexa Dot works fine. Can anyone advise, please?
ReplyDeleteHey Ben , great work! I'm currently working on my senior project. I need to enable the Alexa skill I created to run a script on the raspberry pi. I was able to successfully create the skill, install Alexa to the pi, and create an SQS queue. After installing boto3 and adding my AWS credentials to the queue_service.py and the check_queue.py files, whenever I'd run them I get back an AttributeError: 'module' object has no attribute 'client'. I've tried researching the problem but I couldn't find any solutions or figure out the root of my it. I know you may have a lot on your plate, and I hope all is good on your side, but even a minute of your expertise would be very helpful. If you need additional information, you can reach me via email. Thank you in advance.
ReplyDeleteI would like to show you about my blog.
ReplyDeleteทรรศนะบอล ทรรศนะบอล ทรรศนะบอล
ReplyDeleteOMG! This is a very great blog.
ทรรศนะบอล ทรรศนะบอล ทรรศนะบอล